Sentinel
sentinel在 springcloud Alibaba 中的作用是实现熔断和限流。类似于Hystrix豪猪
下载地址dashboard: https://github.com/alibaba/Sentinel/releases/download/1.7.1/sentinel-dashboard-1.7.1.jar
下载jar包以后,使用【java -jar】命令启动即可。
它使用 8080 端口,用户名和密码都为 : sentinel
随着微服务的流行,服务和服务之间的稳定性变得越来越重要。Sentinel 以流量为切入点,从流量控制、熔断降级、系统负载保护等多个维度保护服务的稳定性。
Sentinel 具有以下特征:
- 丰富的应用场景:Sentinel 承接了阿里巴巴近 10 年的双十一大促流量的核心场景,例如秒杀(即突发流量控制在系统容量可以承受的范围)、消息削峰填谷、集群流量控制、实时熔断下游不可用应用等。
- 完备的实时监控:Sentinel 同时提供实时的监控功能。您可以在控制台中看到接入应用的单台机器秒级数据,甚至 500 台以下规模的集群的汇总运行情况。
- 广泛的开源生态:Sentinel 提供开箱即用的与其它开源框架/库的整合模块,例如与 Spring Cloud、Dubbo、gRPC 的整合。您只需要引入相应的依赖并进行简单的配置即可快速地接入 Sentinel。
- 完善的 SPI 扩展点:Sentinel 提供简单易用、完善的 SPI 扩展接口。您可以通过实现扩展接口来快速地定制逻辑。例如定制规则管理、适配动态数据源等。
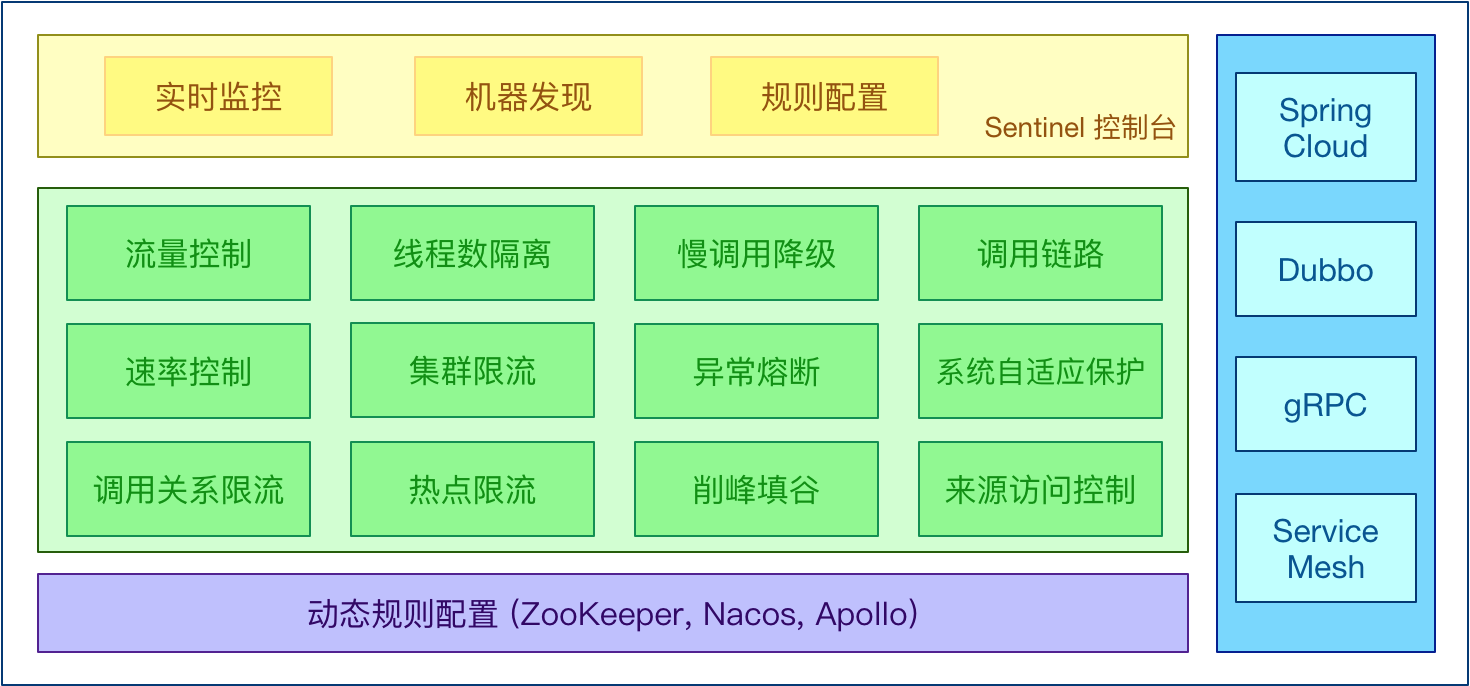
Sentinel 分为两个部分:
- 核心库(Java 客户端)不依赖任何框架/库,能够运行于所有 Java 运行时环境,同时对 Dubbo / Spring Cloud 等框架也有较好的支持。
- 控制台(Dashboard)基于 Spring Boot 开发,打包后可以直接运行,不需要额外的 Tomcat 等应用容器。
Demo
先启动nacos
新建模块 alibaba-sentinel-service8401 ,使用nacos作为服务注册中心
Sentinel可以对service进行监控、熔断、降级
没访问时再sentinel里是看不到监控的应用的,因为是懒加载,需要访问一次
pom依赖:
1
2
3
4
5
6
7
8
9
10
11
12
13
14
15
16
17
18
19
20
21
22
23
24
25
26
27
28
29
30
31
32
33
34
35
36
37
38
39
40
41
42
43
44
45
46
47
48
49
50
51
52
53
54
55
56
57
58
59
60
61
62
63
64
65
66
67
68
69
70
71
72
73
74
75
| <?xml version="1.0" encoding="UTF-8"?>
<project xmlns="http://maven.apache.org/POM/4.0.0"
xmlns:xsi="http://www.w3.org/2001/XMLSchema-instance"
xsi:schemaLocation="http://maven.apache.org/POM/4.0.0 http://maven.apache.org/xsd/maven-4.0.0.xsd">
<parent>
<artifactId>cloud2022</artifactId>
<groupId>com.wzg.springcloud</groupId>
<version>1.0-SNAPSHOT</version>
</parent>
<modelVersion>4.0.0</modelVersion>
<artifactId>alibaba-sentinel-service8401</artifactId>
<dependencies>
<dependency>
<groupId>com.alibaba.csp</groupId>
<artifactId>sentinel-datasource-nacos</artifactId>
</dependency>
<dependency>
<groupId>com.alibaba.cloud</groupId>
<artifactId>spring-cloud-starter-alibaba-sentinel</artifactId>
</dependency>
<dependency>
<groupId>com.alibaba.cloud</groupId>
<artifactId>spring-cloud-starter-alibaba-nacos-discovery</artifactId>
</dependency>
<dependency>
<groupId>org.springframework.boot</groupId>
<artifactId>spring-boot-starter-web</artifactId>
</dependency>
<dependency>
<groupId>org.springframework.boot</groupId>
<artifactId>spring-boot-starter-actuator</artifactId>
</dependency>
<dependency>
<groupId>org.mybatis.spring.boot</groupId>
<artifactId>mybatis-spring-boot-starter</artifactId>
</dependency>
<dependency>
<groupId>org.springframework.boot</groupId>
<artifactId>spring-boot-devtools</artifactId>
<scope>runtime</scope>
<optional>true</optional>
</dependency>
<dependency>
<groupId>org.projectlombok</groupId>
<artifactId>lombok</artifactId>
<optional>true</optional>
</dependency>
<dependency>
<groupId>org.springframework.boot</groupId>
<artifactId>spring-boot-starter-test</artifactId>
<scope>test</scope>
</dependency>
<dependency>
<groupId>com.wzg.springcloud</groupId>
<artifactId>api-commons</artifactId>
<version>${project.version}</version>
</dependency>
</dependencies>
<properties>
<maven.compiler.source>8</maven.compiler.source>
<maven.compiler.target>8</maven.compiler.target>
</properties>
</project>
|
yml 配置:
1
2
3
4
5
6
7
8
9
10
11
12
13
14
15
16
17
18
19
20
21
22
| server:
port: 8401
spring:
application:
name: cloudalibaba-sentinel-service
cloud:
nacos:
discovery:
server-addr: localhost:8848
sentinel:
transport:
dashboard: localhost:8080
port: 8719
management:
endpoints:
web:
exposure:
include: '*'
|
主启动类
1
2
3
4
5
6
7
8
9
10
11
12
13
14
15
16
17
| package com.wzg.springcloud;
import org.springframework.boot.SpringApplication;
import org.springframework.boot.autoconfigure.SpringBootApplication;
import org.springframework.boot.autoconfigure.jdbc.DataSourceAutoConfiguration;
import org.springframework.cloud.client.discovery.EnableDiscoveryClient;
@EnableDiscoveryClient
@SpringBootApplication(exclude = DataSourceAutoConfiguration.class)
public class MainApp8401 {
public static void main(String[] args) {
SpringApplication.run(MainApp8401.class, args);
}
}
|
controller
1
2
3
4
5
6
7
8
9
10
11
12
13
14
15
16
17
18
19
20
21
22
23
24
25
26
27
28
29
30
31
32
33
34
35
36
37
38
39
40
41
42
43
44
45
46
47
48
49
50
51
52
53
54
55
56
| package com.wzg.springcloud.controller;
import com.alibaba.csp.sentinel.annotation.SentinelResource;
import com.alibaba.csp.sentinel.slots.block.BlockException;
import lombok.extern.slf4j.Slf4j;
import org.springframework.web.bind.annotation.GetMapping;
import org.springframework.web.bind.annotation.RequestParam;
import org.springframework.web.bind.annotation.RestController;
@RestController
@Slf4j
public class FlowLimitController {
@GetMapping("/testA")
public String testA() {
return "------testA";
}
@GetMapping("/testB")
public String testB() {
log.info(Thread.currentThread().getName()+"\t"+"...testB");
return "------testB";
}
@GetMapping("/testD")
public String testD() {
log.info("testD 异常比例");
int age = 10/0;
return "------testD";
}
@GetMapping("/testE")
public String testE() {
log.info("testE 测试异常数");
int age = 10/0;
return "------testE 测试异常数";
}
@GetMapping("/testHotKey")
@SentinelResource(value = "testHotKey",blockHandler = "deal_testHotKey")
public String testHotKey(@RequestParam(value = "p1",required = false) String p1,
@RequestParam(value = "p2",required = false) String p2) {
return "------testHotKey";
}
public String deal_testHotKey (String p1, String p2, BlockException exception) {
return "------deal_testHotKey,o(╥﹏╥)o";
}
}
|
1
2
3
4
5
6
7
8
9
10
11
12
13
14
15
16
17
18
19
20
21
22
23
24
25
26
27
28
29
30
31
32
33
34
35
36
37
38
39
| package com.wzg.springcloud.controller;
import com.alibaba.csp.sentinel.annotation.SentinelResource;
import com.alibaba.csp.sentinel.slots.block.BlockException;
import com.wzg.springcloud.entities.CommonResult;
import com.wzg.springcloud.entities.Payment;
import com.wzg.springcloud.handler.CustomerBlockHandler;
import org.springframework.web.bind.annotation.GetMapping;
import org.springframework.web.bind.annotation.RestController;
@RestController
public class RateLimitController {
@GetMapping("/byResource")
@SentinelResource(value = "byResource",blockHandler = "handleException")
public CommonResult byResource() {
return new CommonResult(200,"按资源名称限流测试OK",new Payment(2020L,"serial001"));
}
public CommonResult handleException(BlockException exception) {
return new CommonResult(444,exception.getClass().getCanonicalName()+"\t 服务不可用");
}
@GetMapping("/rateLimit/byUrl")
@SentinelResource(value = "byUrl")
public CommonResult byUrl() {
return new CommonResult(200,"按url限流测试OK",new Payment(2020L,"serial002"));
}
@GetMapping("/rateLimit/customerBlockHandler")
@SentinelResource(value = "customerBlockHandler",
blockHandlerClass = CustomerBlockHandler.class,
blockHandler = "handlerException2")
public CommonResult customerBlockHandler() {
return new CommonResult(200,"按客戶自定义",new Payment(2020L,"serial003"));
}
}
|
handler
1
2
3
4
5
6
7
8
9
10
11
12
13
14
15
16
17
18
| package com.wzg.springcloud.handler;
import com.alibaba.csp.sentinel.slots.block.BlockException;
import com.wzg.springcloud.entities.CommonResult;
public class CustomerBlockHandler {
public static CommonResult handlerException(BlockException exception) {
return new CommonResult(4444,"按客戶自定义,global handlerException----1");
}
public static CommonResult handlerException2(BlockException exception) {
return new CommonResult(4444,"按客戶自定义,global handlerException----2");
}
}
|
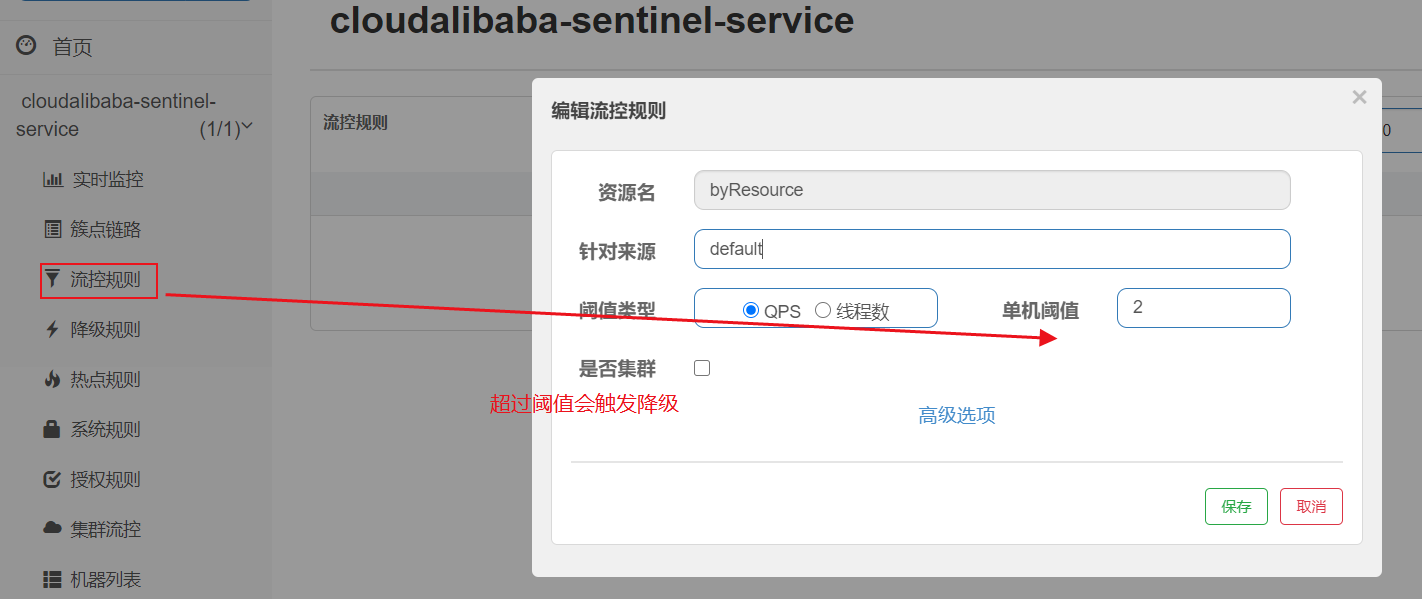
流控规则
- 资源名:唯一名称,默认请求路径
- 针对来源:sentinel可以针对调用者进行限流,填写微服务名,默认default(不区分来源)
- 阈值类型/单机值:
- QPS(每秒钟的请求数量):当调用该api就QPS达到阈值的时候,进行限流
- 线程数.当调用该api的线程数达到阈值的时候,进行限流
- 是否集群:不需要集群
- 流控模式:
- 直接:api达到限流条件时,直接限流。分为QPS和线程数
- 关联:当关联的资到阈值时,就限流自己。别人惹事,自己买单
- 链路:只记录指定链路上的流量(指定资源从入口资源进来的流量,如果达到阈值,就进行限流)【api级别的针对来源】
- 流控效果:
- 快速失败:直接抛异常
- warm up:根据codeFactor(冷加载因子,默认3)的值,从阈值codeFactor,经过预热时长,才达到设置的QPS阈值
重要属性:
| Field |
说明 |
默认值 |
| resource |
资源名,资源名是限流规则的作用对象 |
|
| count |
限流阈值 |
|
| grade |
限流阈值类型,QPS 模式(1)或并发线程数模式(0) |
QPS 模式 |
| limitApp |
流控针对的调用来源 |
default,代表不区分调用来源 |
| strategy |
调用关系限流策略:直接、链路、关联 |
根据资源本身(直接) |
| controlBehavior |
流控效果(直接拒绝/WarmUp/匀速+排队等待),不支持按调用关系限流 |
直接拒绝 |
| clusterMode |
是否集群限流 |
否 |
我们先只针对/testA请求进行限制
流控模式–直接:
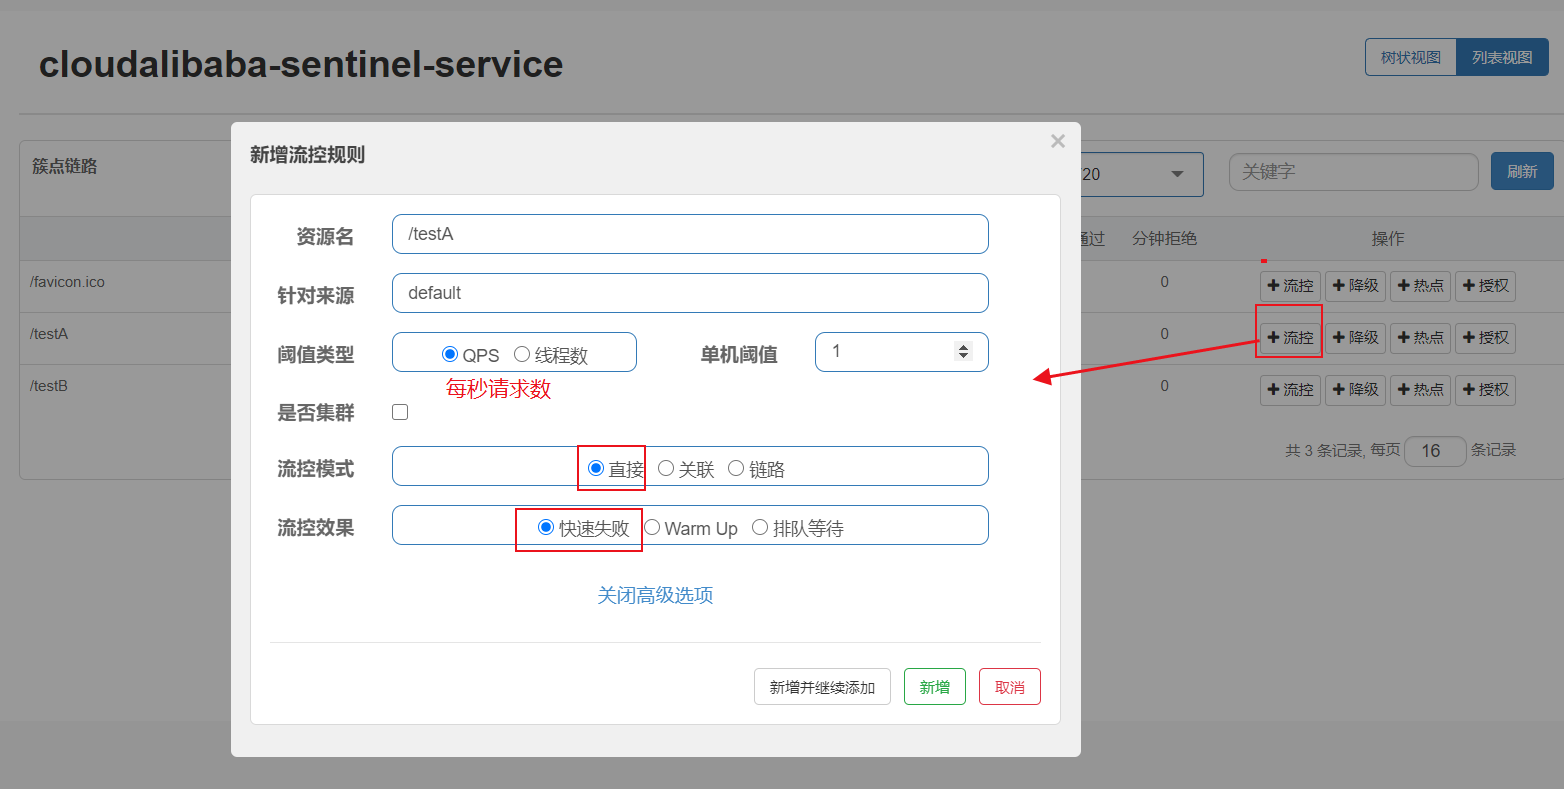
限流表现:当超过阀值,就会被降级。
1s内多次刷新网页,localhost:8401/testA
返回Blocked by Sentienl(flow limiting)
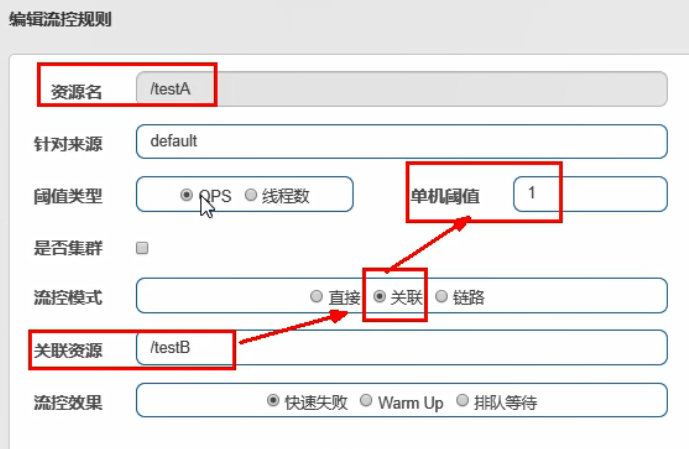
流控模式–关联:
- 当与A关联的资源B达到阀值后,就限流A自己
- B惹事,A挂了。支付达到阈值,限流下单接口。B阈值达到1,A就挂
- 用post访问B让B忙,访问A发现挂了
流控效果–预热Warm up:
访问数量慢慢升高
阈值初一coldFactor(默认3),经过预热时长后才会达到阈值。
流控效果–排队等待:
匀速排队(Ru1eConstant.CONTROL_BEHAVIOR_RATE_LIMITER)方式会严格控制请求通过的间隔时间,即让请求以均匀的速度通过对应的是漏桶算法。详细文档可以参考流量控制-匀速器模式,具体的例子可以参见PaceFlowDemo
熔断降级
新增降级规则:降低策略:RT
RT(平均响应时间,秒级)
平均响应时间 超出阈值 且 在时间窗口内通过的请求>=5,两个条件同时满足后触发降级
窗口期过后关闭断路器
RT最大4900(更大的需要通过-Dcsp.Sentinel.statistic.max.rt=XXXX才能生效)
异常比例(秒级)
QPS>=5且异常比例(秒级统计)超过阈值时,触发降级,时间窗口结束后,关闭降级
sentinel熔断降级会在调用链路中某个资源出现不稳定状态时(例如调用超时或异常比例升高),对这个资源的调用进行限制,让请求快速失败,避免影响到其它的资源而导致级联错误。
当资源被降级后,在接下来的降级时间窗囗之内,对该资源的调用都自动熔断(默认行为是抛出DegradeException)。
降级策略–RT
降级策略–异常比例:
异常比例(DEGRADE-GRADE-EXCEPTION-RATIO):当资源的每秒请求量>=5,并且每秒异常总数占通过的比值超过阈值(DegradeRule中的count)之后,资源进入降级状态,即在接下的时间窗口(DegradeRu1e中的timeWindow,,以s为单位)之内,对这个方法的调用都会自动地返回。异常b阈值范围是[0.0,l.0],代表0%一100%。
降级测录–异常数:
异常数(DEGRADE-GRADE-EXCEPTION-COUNT):当资源近1分钟的异常数目超过阈值之后会进行熔断。注意由于统计时间窗口是分钟级别的,若timeWindow小于60s,则结束熔断状态后仍可能再进入熔断状态。
时间窗口一定要大于等于60秒。
时间窗口结束后关闭降级
localhost:8401/testE , 第一次访问绝对报错,因为除数不能为零,
我们看到error窗口,但是达到5次报错后,进入熔断后降级。
[外链图片转存失败,源站可能有防盗链机制,建议将图片保存下来直接上传(img-0uG4jp95-1615737211171)(images\1597821618735.png)]
热点Key限流
何为热点?热点即经常访问的数据。很多时候我们希望统计某个热点数据中访问频次最高的TopK数据,并对其访问进行限制。比如:
- 商品ID为参数,统计一段时间内最常购买的商品ID并进行限制
- 用户ID为参数,针对一段时间内频繁访问的用户ID进行限制
参数限流会统计传入参数中的参数,并根据配置流阈值与模式,对包含热点参数的资源调用进行限流。热点参数限流可以看做是一种特殊的流量控制,仅对包含热点参数的资源调用生效。
controller层写一个demo:
1
2
3
4
5
6
7
8
9
10
11
12
13
14
15
| @GetMapping("/testhotkey")
@SentinelResource(value = "testhotkey", blockHandler = "deal_testhotkey")
public String testHotKey(
@RequestParam(value="p1", required = false) String p1,
@RequestParam(value = "p2", required = false) String p2
){
return "testHotKey__success";
}
public String deal_testhotkey(String p1, String p2, BlockException e){
return "testhotkey__fail";
}
|
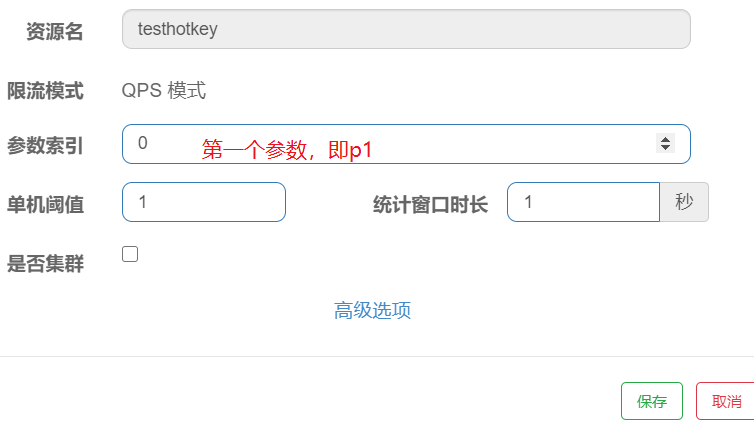
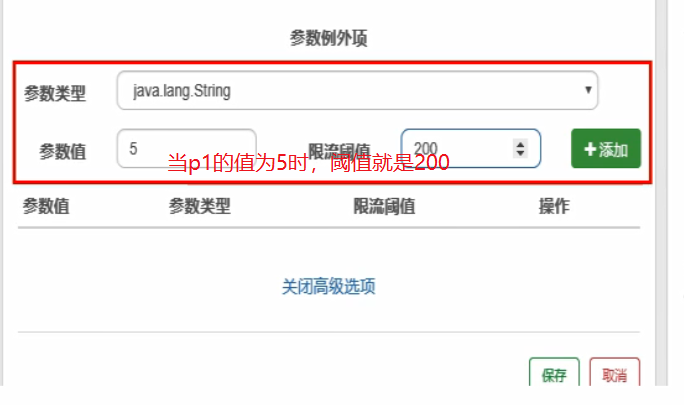
说明:
@SentinelResource :处理的是Sentine1控制台配置的违规情况,有blockHandler方法配置的兜底处理
@RuntimeException:int age=10/0,这个是java运行时报出的运行时异异常RunTimeException,@Sentine1Resource不管
系统规则
一般配置在网关或者入口应用中,但是这个东西有点危险,不但值不合适,就相当于系统瘫痪。
系统自适应限流
Sentinel 系统自适应限流从整体维度对应用入口流量进行控制,结合应用的 Load、CPU 使用率、总体平均 RT、入口 QPS 和并发线程数等几个维度的监控指标,通过自适应的流控策略,让系统的入口流量和系统的负载达到一个平衡,让系统尽可能跑在最大吞吐量的同时保证系统整体的稳定性。
系统规则包含下面几个重要的属性:
| Field |
说明 |
默认值 |
| highestSystemLoad |
load1 触发值,用于触发自适应控制阶段 |
-1 (不生效) |
| avgRt |
所有入口流量的平均响应时间 |
-1 (不生效) |
| maxThread |
入口流量的最大并发数 |
-1 (不生效) |
| qps |
所有入口资源的 QPS |
-1 (不生效) |
| highestCpuUsage |
当前系统的 CPU 使用率(0.0-1.0) |
-1 (不生效) |
@SentinelResource配置
@SentinelResource 注解,主要是指定资源名(也可以用请求路径作为资源名),和指定降级处理方法的。
例如:
1
2
3
4
5
6
7
8
9
10
11
12
13
14
15
16
17
18
19
20
21
| import com.alibaba.csp.sentinel.annotation.SentinelResource;
import com.alibaba.csp.sentinel.slots.block.BlockException;
import com.dkf.springcloud.entities.CommonResult;
import com.dkf.springcloud.entities.Payment;
import org.springframework.web.bind.annotation.GetMapping;
import org.springframework.web.bind.annotation.RestController;
@RestController
public class RateLimitController {
@GetMapping("/byResource")
@SentinelResource(value = "byResource", blockHandler = "handleException")
public CommonResult byResource(){
return new CommonResult(200, "按照资源名限流测试0K", new Payment(2020L,"serial001"));
}
public CommonResult handleException(BlockException e){
return new CommonResult(444, e.getClass().getCanonicalName() + "\t 服务不可用");
}
}
|
很明显,上面虽然自定义了兜底方法,但是耦合度太高,下面要解决这个问题。
自定义全局BlockHandler处理类
写一个 CustomerBlockHandler 自定义限流处理类:
[外链图片转存失败,源站可能有防盗链机制,建议将图片保存下来直接上传(img-khnkVraZ-1615737211177)(images\1597903188558.png)]
整合 openfeign 服务降级
前奏
之前有 open-feign 和 hystrix 的整合,现在来实现sentinel 整合 ribbon + open-feign + fallback 进行服务熔断。
新建三个模块,两个提供者 9004、9005,和一个消费者 84
目的:
fallback管运行异常
blockHandIer管配置违规
上面使用sentinel有一个很明显的问题,就是sentinel,对程序内部异常(各种异常,包括超时)这种捕捉,显得很乏力,它主要是针对流量控制,系统吞吐量,或者是异常比例这种,会发生降级或熔断,但是当程序内部发生异常,直接返回给用户错误页面,根本不会触发异常比例这种降级。所以才需要整合open-feign 来解决程序内部异常时,配置相应的兜底方法
———————————————————–两个提供者模块一致,如下:
pom依赖:
1
2
3
4
5
6
7
8
9
10
11
12
13
14
15
16
17
18
19
20
21
22
23
24
25
26
27
28
29
30
31
32
33
34
35
36
37
38
39
40
41
42
43
44
| <dependencies>
<dependency>
<groupId>com.alibaba.cloud</groupId>
<artifactId>spring-cloud-starter-alibaba-nacos-discovery</artifactId>
</dependency>
<dependency>
<groupId>org.springframework.boot</groupId>
<artifactId>spring-boot-starter-web</artifactId>
</dependency>
<dependency>
<groupId>org.springframework.boot</groupId>
<artifactId>spring-boot-starter-actuator</artifactId>
</dependency>
<dependency>
<groupId>org.mybatis.spring.boot</groupId>
<artifactId>mybatis-spring-boot-starter</artifactId>
</dependency>
<dependency>
<groupId>org.springframework.boot</groupId>
<artifactId>spring-boot-devtools</artifactId>
<scope>runtime</scope>
<optional>true</optional>
</dependency>
<dependency>
<groupId>org.projectlombok</groupId>
<artifactId>lombok</artifactId>
<optional>true</optional>
</dependency>
<dependency>
<groupId>org.springframework.boot</groupId>
<artifactId>spring-boot-starter-test</artifactId>
<scope>test</scope>
</dependency>
<dependency>
<groupId>com.dkf.cloud</groupId>
<artifactId>cloud-api-commons</artifactId>
<version>${project.version}</version>
</dependency>
</dependencies>
|
yml配置:
1
2
3
4
5
6
7
8
9
10
11
12
13
14
| server:
port: 9005
spring:
application:
name: nacos-payment-provider
cloud:
nacos:
discovery:
server-addr: localhost:8848
management:
endpoints:
web:
exposure:
include: '*'
|
主启动类只是启动,没有其它注解。
controller :
1
2
3
4
5
6
7
8
9
10
11
12
13
14
15
16
17
18
19
20
21
22
23
24
25
26
27
| package com.dkf.sprIngcloud.controller;
import com.dkf.springcloud.entities.CommonResult;
import com.dkf.springcloud.entities.Payment;
@RestController
public class PaymentController {
@Value("${server.port}")
private String serverPort;
public static HashMap<Long, Payment> hashMap = new HashMap<>();
static {
hashMap.put(1L, new Payment(1L, "xcxcxcxcxcxcxcxcxcxcxcxcxc11111111"));
hashMap.put(2L, new Payment(2L, "xcxcxcxcggggggggg2222222222222222"));
hashMap.put(3L, new Payment(3L, "xcxcxcxccxxcxcfafdgdgdsgdsgds33333"));
}
@GetMapping("/payment/get/{id}")
public CommonResult paymentSql(@PathVariable("id")Long id){
Payment payment = hashMap.get(id);
CommonResult result = new CommonResult(200, "from mysql, server port : " + serverPort + " ,查询成功", payment);
return result;
}
}
|
—消费者:
pom依赖:
1
2
3
4
5
6
7
8
9
10
11
12
13
14
15
16
17
18
19
20
21
22
23
24
25
26
27
28
29
30
31
32
33
34
35
36
37
38
39
40
41
42
43
44
45
46
47
48
49
50
51
52
53
54
| <dependencies>
<dependency>
<groupId>com.alibaba.csp</groupId>
<artifactId>sentinel-datasource-nacos</artifactId>
</dependency>
<dependency>
<groupId>com.alibaba.cloud</groupId>
<artifactId>spring-cloud-starter-alibaba-sentinel</artifactId>
</dependency>
<dependency>
<groupId>com.alibaba.cloud</groupId>
<artifactId>spring-cloud-starter-alibaba-nacos-discovery</artifactId>
</dependency>
<dependency>
<groupId>org.springframework.boot</groupId>
<artifactId>spring-boot-starter-web</artifactId>
</dependency>
<dependency>
<groupId>org.springframework.boot</groupId>
<artifactId>spring-boot-starter-actuator</artifactId>
</dependency>
<dependency>
<groupId>org.mybatis.spring.boot</groupId>
<artifactId>mybatis-spring-boot-starter</artifactId>
</dependency>
<dependency>
<groupId>org.springframework.boot</groupId>
<artifactId>spring-boot-devtools</artifactId>
<scope>runtime</scope>
<optional>true</optional>
</dependency>
<dependency>
<groupId>org.projectlombok</groupId>
<artifactId>lombok</artifactId>
<optional>true</optional>
</dependency>
<dependency>
<groupId>org.springframework.boot</groupId>
<artifactId>spring-boot-starter-test</artifactId>
<scope>test</scope>
</dependency>
<dependency>
<groupId>com.dkf.cloud</groupId>
<artifactId>cloud-api-commons</artifactId>
<version>${project.version}</version>
</dependency>
</dependencies>
|
yml配置:
1
2
3
4
5
6
7
8
9
10
11
12
13
| server:
port: 84
spring:
cloud:
nacos:
discovery:
server-addr: localhost:8848
sentinel:
transport:
dashboard: localhost:8080
port: 8719
application:
name: nacos-order-consumer
|
主启动类不用说了。
config类里面注入 Resttemplate:
1
2
3
4
5
6
7
8
| @Configuration
public class ApplicationContextConfig {
@Bean
@LoadBalanced
public RestTemplate getRestTemplate(){
return new RestTemplate();
}
}
|
controller 层:
1
2
3
4
5
6
7
8
9
10
11
12
13
14
15
16
17
| @RestController
public class OrderController {
private static final String PAYMENT_URL="http://nacos-payment-provider";
@Resource
private RestTemplate restTemplate;
@GetMapping("/consutomer/payment/get/{id}")
public CommonResult getPayment(@PathVariable("id")Long id){
if(id >= 4){
throw new IllegalArgumentException("非法参数异常...");
}else {
return restTemplate.getForObject(PAYMENT_URL + "/payment/get/" + id, CommonResult.class);
}
}
}
|
上面只实现了 以nacos 作为服务注册中心,消费者使用ribbon 实现负载均衡调用提供者的效果。
正式
只配置 fallback:
1
2
3
4
5
6
7
8
9
10
11
12
13
14
| @GetMapping("/consutomer/payment/get/{id}")
@SentinelResource(value = "fallback", fallback = "handleFallback")
public CommonResult getPayment(@PathVariable("id")Long id){
if(id >= 4){
throw new IllegalArgumentException("非法参数异常...");
}else {
return restTemplate.getForObject(PAYMENT_URL + "/payment/get/" + id, CommonResult.class);
}
}
public CommonResult handleFallback(@PathVariable("id")Long id, Throwable e){
return new CommonResult(414, "---非法参数异常--", e);
}
|
业务异常会被 fallback 处理,返回我们自定义的提示信息,而如果给它加上流控,并触发阈值,只能返回sentinel默认的提示信息。
只配置blockHandler:
1
2
3
4
5
6
7
8
9
10
11
12
13
14
15
16
17
18
19
20
|
@GetMapping("/consutomer/payment/get/{id}")
@SentinelResource(value = "fallback", blockHandler = "handleblockHandler")
public CommonResult getPayment(@PathVariable("id")Long id){
if(id >= 4){
throw new IllegalArgumentException("非法参数异常...");
}else {
return restTemplate.getForObject(PAYMENT_URL + "/payment/get/" + id, CommonResult.class);
}
}
public CommonResult handleblockHandler(@PathVariable("id")Long id, BlockException e){
return new CommonResult(414, "---非法参数异常--", e);
}
|
这时候的效果就是,运行异常直接报错错误页面。在sentinel上添加一个降级规则,设置2s内触发异常2次,触发阈值以后,返回的是我们自定义的 blockhanlder 方法返回的内容。
两者都配置:
1
2
3
4
5
6
7
8
9
10
11
12
13
14
15
16
17
18
19
|
@GetMapping("/consutomer/payment/get/{id}")
@SentinelResource(value = "fallback", blockHandler = "handleblockHandler", fallback = "handleFallback")
public CommonResult getPayment(@PathVariable("id")Long id){
if(id >= 4){
throw new IllegalArgumentException("非法参数异常...");
}else {
return restTemplate.getForObject(PAYMENT_URL + "/payment/get/" + id, CommonResult.class);
}
}
public CommonResult handleFallback(@PathVariable("id")Long id, Throwable e){
return new CommonResult(414, "---非法参数异常--form fallback的提示", e);
}
public CommonResult handleblockHandler(@PathVariable("id")Long id, BlockException e){
return new CommonResult(414, "---非法参数异常--", e);
}
|
明显两者都是有效的,可以同时配置。
全局降级
上面是单个进行 fallback 和 blockhandler 的测试,下面是整合 openfeign 实现把降级方法解耦。和Hystrix 几乎一摸一样!
还是使用上面 84 这个消费者做测试:
- 先添加open-feign依赖:
1
2
3
4
| <dependency>
<groupId>org.springframework.cloud</groupId>
<artifactId>spring-cloud-starter-openfeign</artifactId>
</dependency>
|
- yml 追加如下配置:
1
2
3
4
|
feign:
sentinel:
enabled: true
|
- 主启动类添加注解 : @EnableFeignClients 激活open-feign
- service :
1
2
3
4
5
6
| @FeignClient(value = "nacos-payment-provider", fallback = PaymentServiceImpl.class)
public interface PaymentService {
@GetMapping("/payment/get/{id}")
public CommonResult paymentSql(@PathVariable("id")Long id);
}
|
- service 实现类:
1
2
3
4
5
6
7
8
| @Component
public class PaymentServiceImpl implements PaymentService {
@Override
public CommonResult paymentSql(Long id) {
return new CommonResult(414, "open-feign 整合 sentinel 实现的全局服务降级策略",null);
}
}
|
- controller 层代码没什么特殊的,和普通调用service 一样即可。
- 测试,关闭提供者的项目,会触发 service 实现类的方法。
- 总结: 这种全局熔断,是针对 “访问提供者” 这个过程的,只有访问提供者过程中发生异常才会触发降级,也就是这些降级,是给service接口上这些提供者的方法加的,以保证在远程调用时能顺利进行。而且这明显是 fallback ,而不是 blockHandler,注意区分。
fallback 和 blockHandler 肤浅的区别:
F : 不需要指定规则,程序内部异常均可触发(超时异常需要配置超时时间)
B : 配上也没用,必须去 Sentinel 上指定规则才会被触发。
异常忽略
这是 @SentinelResource 注解的一个值:

持久化
目前的sentinel 当重启以后,数据都会丢失,和 nacos 类似原理。需要持久化。它可以被持久化到 nacos 的数据库中。
- pom依赖:
1
2
3
4
| <dependency>
<groupId>com.alibaba.csp</groupId>
<artifactId>sentinel-datasource-nacos</artifactId>
</dependency>
|
- yml配置:
1
2
3
4
5
6
7
8
9
10
11
| spring:
cloud:
sentinel:
datasource:
ds1:
nacos:
server-addr: localhost:8848
dataId: ${spring.application.name}
group: DEFAULT_GROUP
data-type: json
rule-type: flow
|
- 去nacos上创建一个dataid ,名字和yml配置的一致,json格式,内容如下:
1
2
3
4
5
6
7
8
9
10
11
| [
{
"resource": "/testA",
"limitApp": "default",
"grade": 1,
"count": 1,
"strategy": 0,
"controlBehavior": 0,
"clusterMode": false
}
]
|
resource:资源名称
limitApp:来源应用
grade:阈值类型,0表示线程数,1表示QPS,
count:单机阈值,
strategy:流控模式,0表示直接,1表示关联,2表示链路
controlBehavior:流控效果,0表示快速失败,1表示Warm Up,2表示排队等待;
cIusterM0de是否集群。
- 启动应用,发现存在 关于 /testA 请求路径的流控规则。
- 总结: 就是在 sentinel 启动的时候,去 nacos 上读取相关规则配置信息,实际上它规则的持久化,就是第三步,粘贴到nacos上保存下来,就算以后在 sentinel 上面修改了,重启应用以后也是无效的。


